
Tutorialのお勉強(2)
★ 1.はじめに
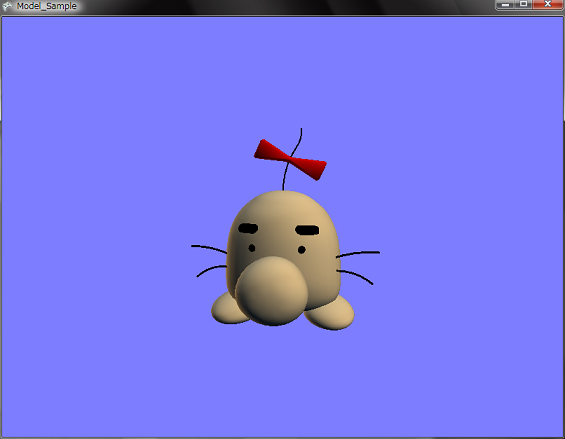
今回は3Dモデルを表示してみます。
★ 2.3Dモデルの表示
まずは前回と同じように,Visual Studio 2005 SP1を立ち上げて,テンプレートを使ってプロジェクトを作成しましょう。
次に自分が読み込みたいモデルをFBXファイルあるいはXファイルで用意しましょう。あとは前回と同じ要領でContensフォルダ内にModelsというフォルダを作成その中にモデルのファイルを入れましょう。
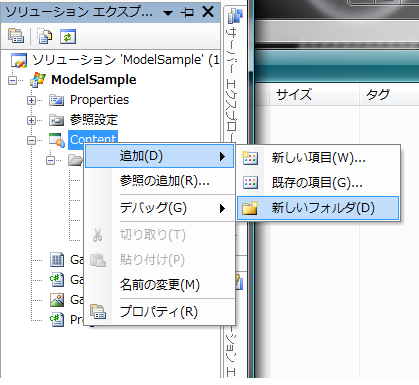
ファイルを入れたら,ソリューションエクスプローラーのContensプロジェクトを右クリックして新しいフォルダを選択し,Modelsというフォルダを作成します。
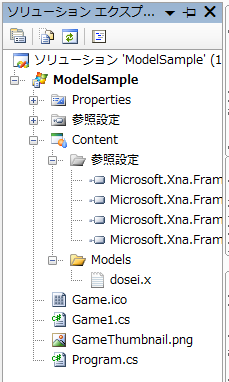
つぎにソリューションエクスプローラーからModelsフォルダを右クリックして既存の項目の追加を選択し,モデルファイルをプロジェクトに追加してください。
追加すると下のようになります。
あとは,ソースコードにモデルを読み込みと描画するコードを追加していきます。
Game1.csを開きます。
場所はどこでもいいと思うのですが,一応Initializeメソッドの下に,モデル用の変数などを記述します。
モデルを取り扱うために必要なModelクラスと3Dの表示に必要なアスペクト比やモデルの位置,回転角などをここで宣言しています。
あとはLoadContentメソッドでモデルのロードとアスペクト比の設定を行います。
真正面向いたままでもいいのですが,「3Dだよ」というのが分かるようにUpdateメソッドにモデルを回転させるための処理をいれます。回転にはラジアンを使うので,0.1度ずつ回転させるためにMathHelper.ToRadiansメソッドを使用して度からラジアンに変換するのを忘れないようにしましょう。(たぶん忘れないとおもいますけど…)
最後のほうにあるDrawメソッドにモデルを描画するための記述を追加します。
モデルデータから行列をとってきてtransformsの中に格納しておきます。あとはforeach文を使ってループさせるみたいです。あとはエフェクト(GPU側)にワールド行列とビュー行列,射影行列をセットします。
foreach文の最後のところでmesh.Drawメソッドを書きメッシュを描画します。
こんな感じで記述すると3Dモデルが描画できるそうです。
普通Tutorialというと三角形ポリゴンの記述の仕方からやったりするんですけど,XNAはすっとばしていきなり3Dモデルの描画なんですね。
次に自分が読み込みたいモデルをFBXファイルあるいはXファイルで用意しましょう。あとは前回と同じ要領でContensフォルダ内にModelsというフォルダを作成その中にモデルのファイルを入れましょう。
ファイルを入れたら,ソリューションエクスプローラーのContensプロジェクトを右クリックして新しいフォルダを選択し,Modelsというフォルダを作成します。
つぎにソリューションエクスプローラーからModelsフォルダを右クリックして既存の項目の追加を選択し,モデルファイルをプロジェクトに追加してください。
追加すると下のようになります。
あとは,ソースコードにモデルを読み込みと描画するコードを追加していきます。
Game1.csを開きます。
場所はどこでもいいと思うのですが,一応Initializeメソッドの下に,モデル用の変数などを記述します。
41 : 	        // 3Dモデル用
42 : 	        Model sampleModel;
43 :
44 : 	        // アスペクト比
45 : 	        float aspectRatio;
46 :
47 : 	        // モデルの位置
48 : 	        Vector3 modelPosition = Vector3.Zero;
49 :
50 : 	        // モデルの回転角
51 : 	        float modelRotation = 0.0f;
52 :
53 : 	        // カメラ位置
54 : 	        Vector3 cameraPosition = new Vector3(0.0f, 1.0f, 5.0f);
55 :
56 : 	        // 背景色
57 : 	        Color backgroundColor = new Color(125, 125, 255, 255);
モデルを取り扱うために必要なModelクラスと3Dの表示に必要なアスペクト比やモデルの位置,回転角などをここで宣言しています。
あとはLoadContentメソッドでモデルのロードとアスペクト比の設定を行います。
60 : 	        /// <summary>
61 : 	        /// LoadContent will be called once per game and is the place to load
62 : 	        /// all of your content.
63 : 	        /// </summary>
64 : 	        protected override void LoadContent()
65 : 	        {
66 : 	            // Create a new SpriteBatch, which can be used to draw textures.
67 : 	            spriteBatch = new SpriteBatch(GraphicsDevice);
68 :
69 : 	            // TODO: use this.Content to load your game content here
70 :
71 : 	            // モデルのロード
72 : 	            sampleModel = Content.Load<Model>("Models/dosei");
73 :
74 : 	            // アスペクト比の設定
75 : 	            aspectRatio = (float)graphics.GraphicsDevice.Viewport.Width / (float)graphics.GraphicsDevice.Viewport.Height;
76 :
77 : 	        }
78 :
真正面向いたままでもいいのですが,「3Dだよ」というのが分かるようにUpdateメソッドにモデルを回転させるための処理をいれます。回転にはラジアンを使うので,0.1度ずつ回転させるためにMathHelper.ToRadiansメソッドを使用して度からラジアンに変換するのを忘れないようにしましょう。(たぶん忘れないとおもいますけど…)
 88 : 	        /// <summary>
 89 : 	        /// Allows the game to run logic such as updating the world,
 90 : 	        /// checking for collisions, gathering input, and playing audio.
 91 : 	        /// </summary>
 92 : 	        /// <param name="gameTime">Provides a snapshot of timing values.</param>
 93 : 	        protected override void Update(GameTime gameTime)
 94 : 	        {
 95 : 	            // Allows the game to exit
 96 : 	            if (GamePad.GetState(PlayerIndex.One).Buttons.Back == ButtonState.Pressed)
 97 : 	                this.Exit();
 98 :
 99 : 	            // TODO: Add your update logic here
100 :
101 : 	            // モデルを回転
102 : 	            modelRotation += (float)gameTime.ElapsedGameTime.TotalMilliseconds * MathHelper.ToRadians(0.1f);
103 :
104 : 	            base.Update(gameTime);
105 : 	        }
106 :
最後のほうにあるDrawメソッドにモデルを描画するための記述を追加します。
モデルデータから行列をとってきてtransformsの中に格納しておきます。あとはforeach文を使ってループさせるみたいです。あとはエフェクト(GPU側)にワールド行列とビュー行列,射影行列をセットします。
foreach文の最後のところでmesh.Drawメソッドを書きメッシュを描画します。
107 : 	        /// <summary>
108 : 	        /// This is called when the game should draw itself.
109 : 	        /// </summary>
110 : 	        /// <param name="gameTime">Provides a snapshot of timing values.</param>
111 : 	        protected override void Draw(GameTime gameTime)
112 : 	        {
113 : 	            graphics.GraphicsDevice.Clear(backgroundColor);
114 :
115 : 	            // TODO: Add your drawing code here
116 :
117 : 	            // 行列をコピー
118 : 	            Matrix[] transforms = new Matrix[sampleModel.Bones.Count];
119 : 	            sampleModel.CopyAbsoluteBoneTransformsTo(transforms);
120 :
121 : 	            // モデルの描画
122 : 	            foreach( ModelMesh mesh in sampleModel.Meshes )
123 : 	            {
124 : 	                foreach ( BasicEffect effect in mesh.Effects )
125 : 	                {
126 : 	                    effect.EnableDefaultLighting();
127 : 	                    effect.World = transforms[mesh.ParentBone.Index] * Matrix.CreateRotationY(modelRotation) * Matrix.CreateTranslation(modelPosition);
128 : 	                    effect.View = Matrix.CreateLookAt(cameraPosition, Vector3.Zero, Vector3.Up);
129 : 	                    effect.Projection = Matrix.CreatePerspectiveFieldOfView(MathHelper.ToRadians(45.0f), aspectRatio, 1.0f, 10000.0f);
130 : 	                }
131 : 	                mesh.Draw();
132 : 	            }
133 : 	            base.Draw(gameTime);
134 : 	        }
こんな感じで記述すると3Dモデルが描画できるそうです。
普通Tutorialというと三角形ポリゴンの記述の仕方からやったりするんですけど,XNAはすっとばしていきなり3Dモデルの描画なんですね。
★ Download
本ソースコードおよびプログラムを使用したことによる如何なる損害も製作者は責任を負いません。
本ソースコードおよびプログラムは自己責任でご使用ください。
プログラムの作成にはMicrosoft Visual Studio 2005 SP1 Professional, XNA Game Studio 2.0を用いています。
本ソースコードおよびプログラムは自己責任でご使用ください。
プログラムの作成にはMicrosoft Visual Studio 2005 SP1 Professional, XNA Game Studio 2.0を用いています。