こういうときはチュートリアルを見て勉強するのがいいんじゃないと思うので,まずはチュートリアルをいじってみることにしました。
今回は2次元でテクスチャを読み込んでスプライトに貼り付けるでもを試してみます。

Tutorialのお勉強(1)★ 1.はじめに
まだ,XNAに関して右も左もわからない状態です。
こういうときはチュートリアルを見て勉強するのがいいんじゃないと思うので,まずはチュートリアルをいじってみることにしました。 今回は2次元でテクスチャを読み込んでスプライトに貼り付けるでもを試してみます。 ★ 2.プロジェクトの作成
まずは,テンプレートを利用してプロジェクトを作成しましょう。
Visual Studio 2005 SP1を立ち上げて,画面上部のメニューからファイル→新規作成→プロジェクトを選択します。 すると,下のようなダイアログボックスが出てくるので,ダイアログボックス左にあるプロジェクトの種類からVisual C#→XNA Game Studio 2.0を選択します。次にVisual Studioにインストールされたテンプレートという中からWindows Game(2.0)を選択し,ダイアログボックス下側にあるプロジェクト名に,プロジェクト名を適当に入力してOKボタンを押します。 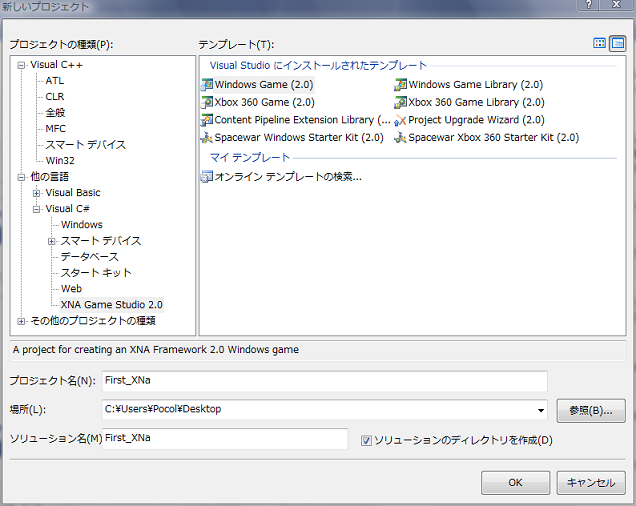 OKボタンを押すと,自動的にプロジェクトが作成されます。 プロジェクトが作成されたら,次にテクスチャを読み込むための準備に入ります。 テクスチャ用の画像ファイルを用意します。用意ができたら,作成したプロジェクトがあるフォルダ内にContentという名前のフォルダがあるので,そこに画像ファイルを置きます。 次に今Contentフォルダにおいた画像ファイルをプロジェクトに追加します。 Visual Studio 2005 SP1のソリューションエクスプローラーから作成したプロジェクト名→Contentプロジェクトを見つけます。Contentプロジェクトを右クリックして,追加→既存の項目を選択してください。 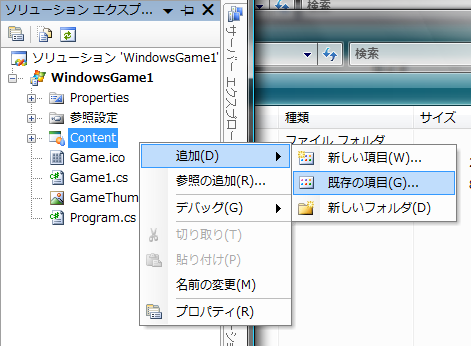 ダイアログボックスがでてくると思うので,フォルダにおいた画像ファイルを選択して追加ボタンを押します。 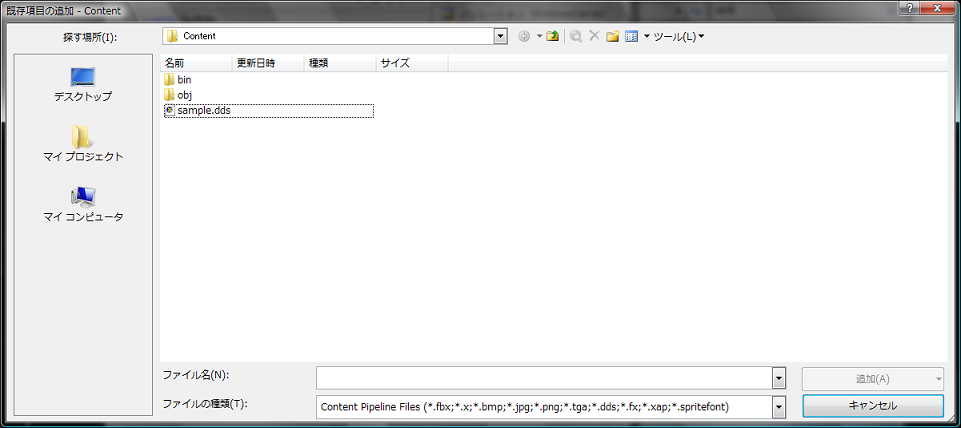 追加されたのが確認できたら,テクスチャを表示するためにコードを追加していきます。 ソリューションエクスプローラーからGame1.csファイルをクリックしてGame1.csファイルを表示させてください。 protected overide void Initialize()の下にTexture2DとVector2型の変数を追加します。
	/// <summary>
        /// Allows the game to perform any initialization it needs to before starting to run.
        /// This is where it can query for any required services and load any non-graphic
        /// related content.  Calling base.Initialize will enumerate through any components
        /// and initialize them as well.
        /// </summary>
        protected override void Initialize()
        {
            // TODO: Add your initialization logic here

            base.Initialize();
        }

        // レンダリングに使うテクスチャ
        Texture2D sampleTexture;

        // スプライトを描画するための座標をセット
        Vector2 spritePosition = Vector2.Zero;
つぎに,LoadContentメソッド内にテクスチャを読み込むためのコードを追加します。
	/// <summary>
        /// LoadContent will be called once per game and is the place to load
        /// all of your content.
        /// </summary>
        protected override void LoadContent()
        {
            // Create a new SpriteBatch, which can be used to draw textures.
            spriteBatch = new SpriteBatch(GraphicsDevice);

            // TODO: use this.Content to load your game content here
            // テクスチャの読み込み
            sampleTexture = Content.Load<Texture2D>("sample");   // ※拡張子はつけちゃだめ!
        }
ここで気をつけてほしいのはContentManager.Load()メソッドによってテクスチャの読み込みを行うのですが,アセット名を引数として渡すので,拡張子抜きのファイル名を指定することです。コンテントを破棄する記述も追加しておきましょう。UnloadContent()メソッドにContent.Unload();の一行を入れておきます。UnloadContent()メソッドの下にスプライトの移動速度として用いるVector2型の変数も追加しておいてください。
	/// <summary>
        /// UnloadContent will be called once per game and is the place to unload
        /// all content.
        /// </summary>
        protected override void UnloadContent()
        {
            // TODO: Unload any non ContentManager content here
	    // 後片付け
	    Content.Unload();
        }

	// スプライトの移動スピード
        Vector2 spriteSpeed = new Vector2(50.0f, 50.0f);
次に,Update()メソッド内にスプライトを動かすための自作メソッドを追加します。
	/// <summary>
        /// Allows the game to run logic such as updating the world,
        /// checking for collisions, gathering input, and playing audio.
        /// </summary>
        /// <param name="gameTime">Provides a snapshot of timing values.</param>
        protected override void Update(GameTime gameTime)
        {
            // Allows the game to exit
            if (GamePad.GetState(PlayerIndex.One).Buttons.Back == ButtonState.Pressed)
                this.Exit();

            // TODO: Add your update logic here
            // スプライトの移動
            UpdateSprite(gameTime);

            base.Update(gameTime);
        }
忘れないようにUpdate()メソッドの下に自作メソッドのUpdateSprite()を付け足しておきます。このメソッドでやっていることはスピードとゲーム時間によってスプライトの位置を更新します。しかし,これだけだとウィンドウの領域より外側に行ってしまって表示されなくなってしまうため,ウィンドウの領域内に残るようにウィンドウの端っこにいったら反射させる処理をします。
	/// <summary>
        /// スプライトの位置の更新をする
        /// </summary>
        /// <param name="gameTime">このメソッドが呼ばれたときのゲーム時間</param>
        void UpdateSprite(GameTime gameTime)
        {
            // スピードによってスプライトを動かす
            spritePosition += spriteSpeed * (float)gameTime.ElapsedGameTime.TotalSeconds;

            int MaxX = graphics.GraphicsDevice.Viewport.Width - sampleTexture.Width;
            int MinX = 0;
            int MaxY = graphics.GraphicsDevice.Viewport.Height - sampleTexture.Height;
            int MinY = 0;

            // 境界チェック
            // 右
            if (spritePosition.X > MaxX)
            {
                spriteSpeed.X *= -1;
                spritePosition.X = MaxX;
            }
            // 左
            else if (spritePosition.X < MinX)
            {
                spriteSpeed.X *= -1;
                spritePosition.X = MinX;
            }
            // 上
            else if (spritePosition.Y > MaxY)
            {
                spriteSpeed.Y *= -1;
                spritePosition.Y = MaxY;
            }
            // 下
            else if (spritePosition.Y < MinY)
            {
                spriteSpeed.Y *= -1;
                spritePosition.Y = MinY;
            }
        }
最後にDraw()メソッド内にスプライトを描画するためのコードを追加して終了です。
/// <summary>
/// This is called when the game should draw itself.
/// </summary>
/// <param name="gameTime">Provides a snapshot of timing values.</param>
protected override void Draw(GameTime gameTime)
{
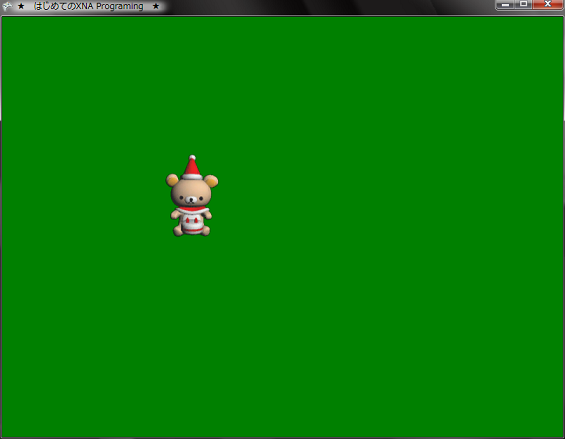
graphics.GraphicsDevice.Clear(Color.Green);
// TODO: Add your drawing code here
// スプライトの描画
spriteBatch.Begin(SpriteBlendMode.AlphaBlend);
spriteBatch.Draw(sampleTexture, spritePosition, Color.White);
spriteBatch.End();
base.Draw(gameTime);
}
ちなみにバックバッファの色はgraphics.GraphicsDevice.Clear()メソッドの引数の部分を変えれば変更することができます。何か想像していたものよりもかなり扱いやすい感じですね。 ★ Download
本ソースコードおよびプログラムを使用したことによる如何なる損害も製作者は責任を負いません。
本ソースコードおよびプログラムは自己責任でご使用ください。 プログラムの作成にはMicrosoft Visual Studio 2005 SP1 Professional, XNA Game Studio 2.0を用いています。 |