
インデックスバッファを使ってみる!
★ 1.はじめに
今回はインデックスバッファを使ってみます。
★ 2.インデックスバッファを使ってみる
物体を表示するとき,頂点数よりも面数のほうが多いということが多いです。前回やったやり方ですと,こういった場合には頂点を重複して定義する必要があります。そのため頂点データの量が大きくなってしまいます。
たとえば,四面体であれば,面数は4つで頂点数が4です。しかし,三角形を4つ書くためには「4×3=12頂点」のデータが必要になります。本来は4つで済むのに12個頂点データを用意しなければならないというのはあまりうまいやり方ではありません。
できることであれば,頂点は重複して定義しないほうが,頂点データの量が減らせます。これを可能とする一つの手法がインデックスを用いて物体を描画するやり方です。
例えば,四面体であれば,4つの頂点を定義して,4つの面を構成する頂点の番号さえわかれば,対応する頂点のデータを頂点番号から持ってくればいいということになります。これをプログラムで行うにはインデックスバッファを用います。
プログラムではまず,頂点バッファとインデックスバッファ, インデックスデータを格納するための変数を用意します。
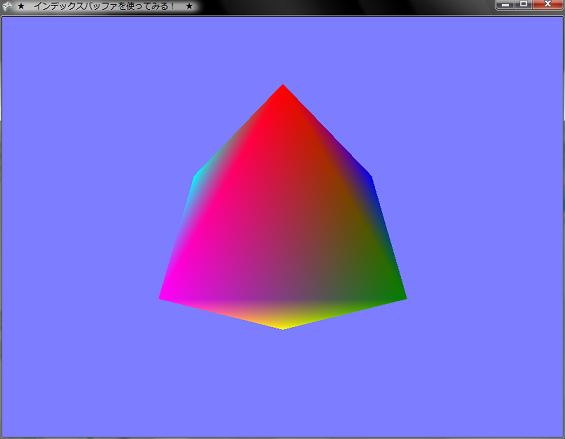
今回のプログラムでは,八面体を作成します。八面体は頂点数が6つで,面数が8です。
前回と同じようにまずは,頂点データを定義し,頂点バッファを作成します。
次に,面を構成するための頂点番号をvertexIndicesというshort型の変数にいれていきます。別にshort型ではなくてint型でもいいのですが,大量のポリゴンデータは使うわけではないのでshort型の範囲で十分足りるので,わざわざ無駄にメモリを使う必要はありません。short型を使ってメモリの消費を抑えておくことにします。
インデックスデータは三角形を8個描くので24個必要になります。あとはインデックスバッファを作成します。インデックスバッファを作成し終えたら,SetDate()メソッドを使って,インデックスデータをバッファに流し込みましょう。
あとは描画処理ですが,頂点バッファをセットするという処理の他にインデックスバッファをセットするという処理を追加します。
たとえば,四面体であれば,面数は4つで頂点数が4です。しかし,三角形を4つ書くためには「4×3=12頂点」のデータが必要になります。本来は4つで済むのに12個頂点データを用意しなければならないというのはあまりうまいやり方ではありません。
できることであれば,頂点は重複して定義しないほうが,頂点データの量が減らせます。これを可能とする一つの手法がインデックスを用いて物体を描画するやり方です。
例えば,四面体であれば,4つの頂点を定義して,4つの面を構成する頂点の番号さえわかれば,対応する頂点のデータを頂点番号から持ってくればいいということになります。これをプログラムで行うにはインデックスバッファを用います。
プログラムではまず,頂点バッファとインデックスバッファ, インデックスデータを格納するための変数を用意します。
00032:          // 頂点バッファ・インデックスバッファ関係
00033:          VertexBuffer vertexBuffer = null;
00034:          IndexBuffer indexBuffer = null;
00035:          short[] vertexIndices = null;
次に,頂点バッファとインデックスバッファをInitializeVertices()メソッドで作成します。
00080:          /// <summary>
00081:          /// 頂点の初期化
00082:          /// </summary>
00083:          void InitializeVertices()
00084:          {
00085:              // 頂点数
00086:              int numVertex = 6;
00087:
00088:              // 面数
00089:              int numFace = 8;
00090:
00091:              // 頂点バッファを作成
00092:              vertexBuffer = new VertexBuffer(graphics.GraphicsDevice, VertexPositionColor.SizeInBytes * numVertex, BufferUsage.None);
00093:
00094:              // 頂点データを作成
00095:              VertexPositionColor[] vert = new VertexPositionColor[numVertex];
00096:
00097:              // 頂点データの設定
00098:              vert[0] = new VertexPositionColor(new Vector3(0.0f, 1.0f, 0.0f), Color.Red);
00099:              vert[1] = new VertexPositionColor(new Vector3(1.0f, 0.0f, 0.0f), Color.Green);
00100:              vert[2] = new VertexPositionColor(new Vector3(0.0f, 0.0f, -1.0f), Color.Blue);
00101:              vert[3] = new VertexPositionColor(new Vector3(-1.0f, 0.0f, 0.0f), Color.Cyan);
00102:              vert[4] = new VertexPositionColor(new Vector3(0.0f, 0.0f, 1.0f), Color.Magenta);
00103:              vert[5] = new VertexPositionColor(new Vector3(0.0f, -1.0f, 0.0f), Color.Yellow);
00104:
00105:              // 頂点バッファに頂点データをセット
00106:              vertexBuffer.SetData<VertexPositionColor>(vert);
00107:
00108:              // インデックスデータを作成
00109:              vertexIndices = new short[] {
00110:                  0, 2, 1,
00111:                  0, 3, 2,
00112:                  0, 4, 3,
00113:                  0, 1, 4,
00114:                  5, 4, 1,
00115:                  5, 1, 2,
00116:                  5, 2, 3,
00117:                  5, 3, 4,
00118:              };
00119:
00120:              // インデックスバッファを作成
00121:              indexBuffer = new IndexBuffer(graphics.GraphicsDevice, 3 * numFace * sizeof(short), BufferUsage.None, IndexElementSize.SixteenBits);
00122:
00123:              // インデックスバッファにインデックスデータをセット
00124:              indexBuffer.SetData<short>(vertexIndices);
00125:          }
00126:
今回のプログラムでは,八面体を作成します。八面体は頂点数が6つで,面数が8です。
前回と同じようにまずは,頂点データを定義し,頂点バッファを作成します。
次に,面を構成するための頂点番号をvertexIndicesというshort型の変数にいれていきます。別にshort型ではなくてint型でもいいのですが,大量のポリゴンデータは使うわけではないのでshort型の範囲で十分足りるので,わざわざ無駄にメモリを使う必要はありません。short型を使ってメモリの消費を抑えておくことにします。
インデックスデータは三角形を8個描くので24個必要になります。あとはインデックスバッファを作成します。インデックスバッファを作成し終えたら,SetDate()メソッドを使って,インデックスデータをバッファに流し込みましょう。
あとは描画処理ですが,頂点バッファをセットするという処理の他にインデックスバッファをセットするという処理を追加します。
00174:          /// <summary>
00175:          /// This is called when the game should draw itself.
00176:          /// </summary>
00177:          /// <param name="gameTime">Provides a snapshot of timing values.</param>
00178:          protected override void Draw(GameTime gameTime)
00179:          {
00180:              graphics.GraphicsDevice.Clear(bgColor);
00181:
00182:              // TODO: Add your drawing code here
00183:
00184:              // 頂点データ定義の設定
00185:              graphics.GraphicsDevice.VertexDeclaration = new VertexDeclaration(graphics.GraphicsDevice, VertexPositionColor.VertexElements);
00186:
00187:              // 頂点バッファをセット
00188:              graphics.GraphicsDevice.Vertices[0].SetSource(vertexBuffer, 0, VertexPositionColor.SizeInBytes);
00189:
00190:              // インデックスバッファをセット
00191:              graphics.GraphicsDevice.Indices = indexBuffer;
00192:
00193:              // 頂点カラー有効化
00194:              effect.VertexColorEnabled = true;
00195:
00196:              // エフェクトに行列を送る
00197:              effect.Projection = projection;
00198:              effect.View = view;
00199:              effect.World = world;
00200:
00201:              // 描画処理
00202:              effect.Begin();
00203:              foreach(EffectPass pass in effect.CurrentTechnique.Passes)
00204:              {
00205:                  pass.Begin();
00206:                  graphics.GraphicsDevice.DrawIndexedPrimitives(PrimitiveType.TriangleList, 0, 0, 6, 0, 8);
00207:                  pass.End();
00208:              }
00209:              effect.End();
00210:
00211:              base.Draw(gameTime);
00212:          }
00213:      }
こんな感じで,インデックスバッファが使えるみたいです。★ Download
本ソースコードおよびプログラムを使用したことによる如何なる損害も製作者は責任を負いません。
本ソースコードおよびプログラムは自己責任でご使用ください。
プログラムの作成にはMicrosoft Visual Studio 2005 SP1 Professional, XNA Game Studio 2.0を用いています。
本ソースコードおよびプログラムは自己責任でご使用ください。
プログラムの作成にはMicrosoft Visual Studio 2005 SP1 Professional, XNA Game Studio 2.0を用いています。